Migrating Spring MVC From JSP to AngularJS
This article is written for Spring developers who are familiar with JSP development and who would like to understand how to migrate to a frontend-based web application like AngularJS.
Introduction on AngularJS
AngularJS is a Javascript framework created at Google that touts itself as a “Superheroic Web MVW Framework” (where the “W” in the “MVW” being a tongue-in-cheek reference to “Whatever” for all the various MVx architecture).As it is based on an MVx architecture, AngularJS provides a structure to Javascript development and thus gives Javascript an elevated status compared to traditional Spring + JSP application that probably uses Javascript to provide that bit of interactivity on the user interface. With AngularJS, your Javascript application will also inherit features like Dependency-Injection, HTML-vocabulary extension (via the use of custom directives), unit-testing and functional testing integration as well as DOM-selectors ala JQuery (using jqLite as it provides only a subset of JQuery but you could also easily use JQuery if you prefer). AngularJS also introduces scopes to your Javascript code so that variables declared in your code are bound only to the scope that is required.This prevents variables pollution that inadvertently arises when the size of your Javascript grows.
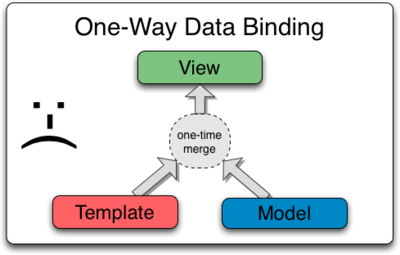
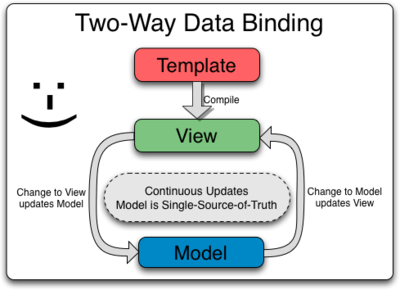
When you are developing a Spring MVC application using JSP, you usually use forms to submit data to the backend for processing. Your model for the application is then mapped to the form field values that you have submitted via the HTML form tag. The mapping of the form fields to your model in the backend is thus something that needs to be done manually. Some of you may recognise the value of having automatic binding from your Java POJO to a HTML view but AngularJS goes one step further and provide a mechanism for 2-way data-binding. That means that not only do you have the benefits of having your view updated with changes inside your Javascript model, any changes you make to your UI will also update the Javascript model (and consequently any other views that is bound to that model). It is almost magical to see all the views that are bound to the same JS model on the app update itself automatically. Moreover, since your model can be set to a particular scope, only views that belong to the same scope will be affected, allowing you to sandbox code that should be local only to a particular portion of your view. (This is done via an AngularJS attribute called ng-controller that is set in your HTML templates)
You can see an illustration of the difference here
You can also see this in action with the following embedded plunker code
Using AngularJS, it is possible to write relatively complex User Interface in an organised and elegant manner, always encapsulating the required logic within your components and never running the risk of errant global Javascript variables polluting your scope. As we can see later, it is also very testable, and there are built-in mechanisms to perform tests at the unit and functional level, ensuring that all your User Interface codebase goes through the same rigourous testing that your Java/Spring code undergoes, ensuring quality even at your user interfaces.
Another advantage of using AngularJS to write your html templates is that the templates are essentially similar to html even with the various frontend logic baked into your view. It is possible to incorporate AngularJS logic into your template and still pass a HTML validation. Try viewing a JSP file from a browser with all the template logic in place and most likely your browser will give up rendering the page. You can see how a typical AngularJS template looks like :
<div class="row thumbnail-wrapper">
  <div data-ng-repeat="pet in currentOwner.pets" class="col-md-3">
    <div class="thumbnail">
      <img data-ng-src="images/pets/pet{{pet.id % 10 + 1}}.jpg" class="img-circle" alt="Generic placeholder image">
      <div class="caption">
        <h3 class="caption-heading" data-ng-bind="pet.name">Basil</h3>
        <p class="caption-meta" data-ng-bind="pet.birthdate">08 August 2012</p>
        <p class="caption-meta"><span class="caption-label" data-ng-bind="pet.type.name">Hamster</span></p>
      </div>
      <div class="action-bar">
        <a class="btn btn-default" data-toggle="modal" data-target="#petModal" data-ng-click="editPet(pet.id)">
          <span class="glyphicon glyphicon-edit" aria-hidden="true"></span> Edit Pet
        </a>
        <a class="btn btn-default">
          <span></span> Add Visit
        </a>
      </div>
    </div>
  </div>
</div>
You can probably spot some non-HTML addition to the template includes attributes like “data-ng-click” which maps a click on a button to a method name call. There’s also “data-ng-repeat” which will look through a JSON object and generate the necessary html to render the same view for each item in the list. Yet with all these logic in place, we are still able to validate and view the html template from the browser. AngularJS calls all the non-html tags and attributes “directives” and the purpose of these directives is to enhance the capabilities of HTML.
Scope in AngularJS
One important concept to grasp in AngularJS is that of scopes. In the past, whenever I had to write javascript for my web application, I had to manage the variable names and construct special name-spaced objects in order to store my scoped properties. However, AngularJS does it for you automatically based on its MVx concept. Every directive will inherit a scope from its controller (or if you would like, an isolate scope that does not inherit scope properties) where the properties and variables created in this scope does not pollute the rest of the scopes or global context.
Scopes are used as the “glue” of an AngularJS application. Controllers in AngularJS use scopes to interact with the views. Scopes are also used to pass models and properties between directives and controllers. The advantage of this is that we are now forced to design our application in a way which components are self-contained and relationships between components have to be considered carefully through a use of a model that can be prototypically inherited from a parent.
A scope can be nested in another scope prototypically in the same way Javascript implements its inheritance model via prototyping. However, one must be careful that any property name that is declared in the child scope that is similar to the parent will be hide the parent property from the child scope thereafter.
At the very top in the hierarchy of scopes is the $rootScope, a scope that is accessible globally and can be used as the last resort to share properties and models across the whole application. The use of this should be minimized as it introduces a sort of “global” variable that can pose the same problems when it is over-used.
More information about scopes can be gleaned from the AngularJS documentation found here
Directives in AngularJS
Directives is one of the most important concept in AngularJS and it is indeed the foundation of what we constitute AngularJS in the markup. It is essentially all the additional customized markup in the form of element, attributes, classes or comments in our HTML markup that gives the markup new functionalities.
Consider the following code snippet that demonstrates a customized directive called wdsCustom that will replace the markup element *
As this article does not attempt to teach you how to write a directive, you can refer to the official documentation here.
Differences in architecture between JSP and AngularJS
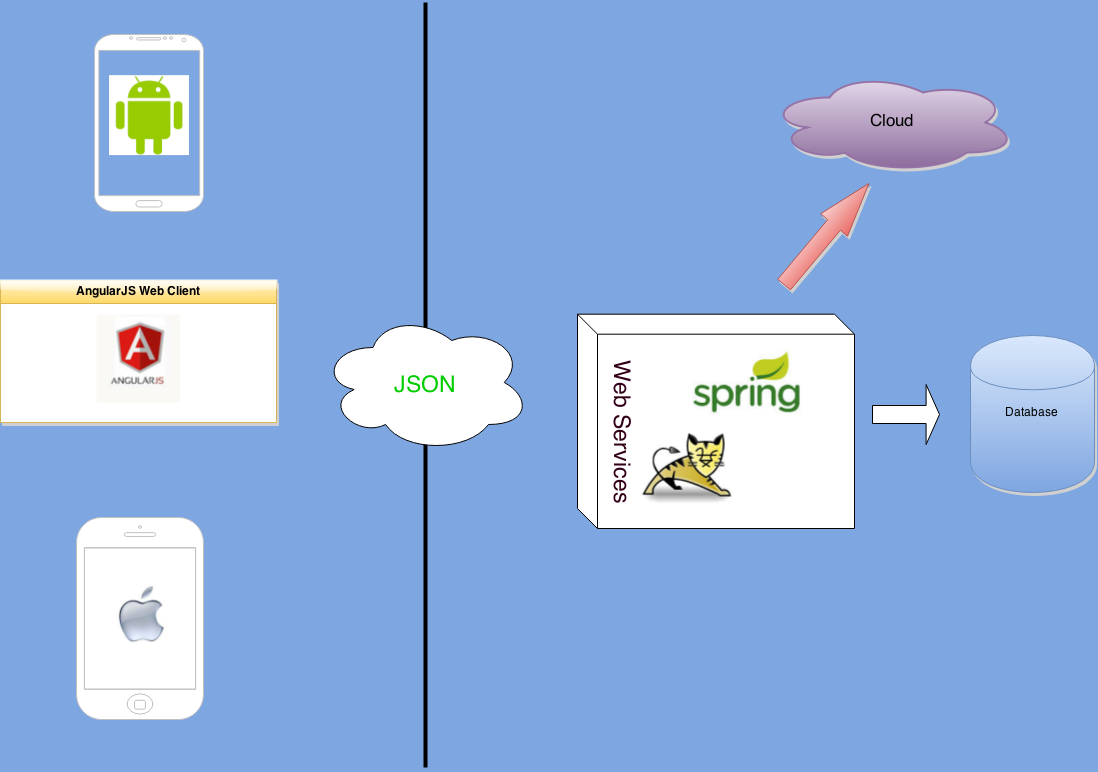
When one migrates from a server-side templating engine like JSP or Thymeleaf to a Javascript-based templating engine, one has to experience a paradigm shift towards a client-server architecture. One has to cease thinking of the view as being a part of the web application and instead conceive the web application as 2 separate client-side and server-side applications. An illustration of this is in the next diagram which shows how a Spring application becomes a provider of RESTful Web Services, servicing various front end applications including an AngularJS browser-based application as well as a possibility to provide services for mobile clients like tablets or smartphones. These services could include OAuth, Authentication and other business logic services which should be obfuscated from public view. One should bear in mind that any data or business logic that is published in the form of JSON or javascript files are exposed for the client-side to see. Thus, if there’s any business sensitive logic or workflow that should not be exposed, these logic should only be performed on the backend.
Application structure
One question when we migrate over to AngularJS are the questions on how we would want to organise our AngularJS + Spring application. At my company WDS, we are using Maven as our dependency and package management tool for Java/Spring and that influenced how we decided to place our AngularJS javascript application. The AngularJS application is created within src/main/webapp and the main files are
components/ # the various components are stored here
js/app.js # where we bootstrap the application
services/ # common services are stored here
plugins/ # additional external plugins e.g. jquery
images/
videos/
You can see an image capture of the folder structure in Eclipse 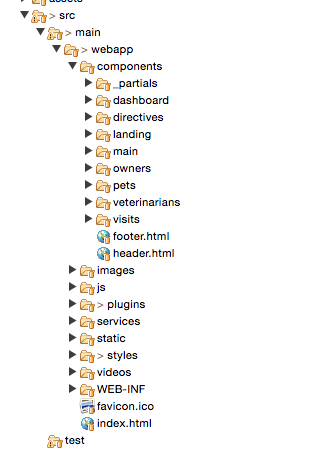 . This way of grouping the resources uses the feature-grouping method. There are also ways to group your resources based on types, e.g. grouping all your controllers, services and views into its namesake folder. There are pros and cons for either option but we prefer to use the feature grouping way to contain our resources.
Considerations when moving from JSP to AngularJS
If you are considering migrating from JSP to AngularJS, there are a few factors to consider for a successful migration.
Converting your Spring controllers to RESTful services
You will need to transform your controllers so instead of forwarding the response to a templating engine to render a view to the client, you will provide services that will be serialised into JSON data instead. The following is an example of how a standard Spring MVC controller RequestMapping uses the ModelAndView object to render a view with the Owner as described in the url mapping.
@RequestMapping("/owners/{ownerId}")
public ModelAndView showOwner(@PathVariable("ownerId") int ownerId) {
    ModelAndView mav = new ModelAndView("owners/ownerDetails");
    mav.addObject(this.clinicService.findOwnerById(ownerId));
    return mav;
}
A controller RequestMapping like that can be converted into an equivalent RESTful service that returns the owner based on the ownerId. Your template can then be moved into AngularJS which will then bind the owner object to the AngularJS template.
@RequestMapping(value = "/owners/{id}", method = RequestMethod.GET)
public @ResponseBody Owner find(@PathVariable Integer id) {
    return this.clinicService.findOwnerById(id);
}
In order for Spring MVC to convert your return object (which needs to be Serializable) to a JSON object, you need to configure your Spring context file to include a conversion service that uses Jackson2 for JSON serialisation. An example of the snippet that performs this Spring context configuration is shown below.
<bean id="objectMapper" class="org.springframework.http.converter.json.Jackson2ObjectMapperFactoryBean" p:indentOutput="true" p:simpleDateFormat="yyyy-MM-dd'T'HH:mm:ss.SSSZ"></bean>
<mvc:annotation-driven conversion-service="conversionService" >
	<mvc:message-converters>
		<bean class="org.springframework.http.converter.json.MappingJackson2HttpMessageConverter" >
			<property name="objectMapper" ref="objectMapper" />
		</bean>
	</mvc:message-converters>
</mvc:annotation-driven>
Once you have converted your controllers into RESTful services, you can then access these resources from your AngularJS application.
One nice way to access RESTful services in AngularJS is to use the built-in ngResource directive that allows you to access your RESTful services in an elegant and concise manner. An example of the Javascript code to access RESTful services using this directive can be illustrated by the following:
var Owner = ['$resource','context', function($resource, context) {
	return $resource(context + '/api/owners/:id');
}];

app.factory('Owner', Owner);

var OwnerController = ['$scope','$state','Owner',function($scope,$state,Owner) {
	$scope.$on('$viewContentLoaded', function(event){
		$('html, body').animate({
		    scrollTop: $("#owners").offset().top
		}, 1000);
	});

	$scope.owners = Owner.query();
}];
The above snippet shows how a “resource” can be created by declaring an Owner resource and then initialising it as an Owner service. The controller can then use this service to query for Owners from the RESTful endpoint. In this way, you can easily create the resources that your application require and map it easily to your business domain model.
Application States
An AngularJS application is essentially a Single Page Application from the perspective of the server side. It means that you may simply just serve a single JSP file as your main page and the AngularJS application will be responsible for displaying various view states thereafter. You will need to consider how you would like to detach your view logic from the JSP and transplant it onto AngularJS. One useful AngularJS plugin to consider for use is UI-Router which provides a very good way to map view states to your location url. I prefer using this over the standard ngRoute module because UI-Router supports nested views (meaning states can be nested into more than just 1 level). An example on how you can configure the various location routes to map to the various states during the AngularJS application bootstrapping phase.
app.config(['stateHelperProvider','$urlRouterProvider','$urlMatcherFactoryProvider',function(stateHelperProvider,$urlRouterProvider,$urlMatcherFactoryProvider) {

	$urlRouterProvider.otherwise("/");

	$urlMatcherFactoryProvider.strictMode(false)

	stateHelperProvider.state({
		name: "landing",
		url: "/",
		templateUrl: "components/landing/landing.html",
		controller: "MainController",
		data: { requireLogin : false }
	}).state({
		name: "dashboard",
		url: "/dashboard",
		templateUrl: "components/dashboard/dashboard.html",
		controller: "DashboardController",
		data: { requireLogin : true }
	}).state({
		name: "vets",
		url: "/vets",
		templateUrl: "components/veterinarians/veterinarians.html",
		controller: "VeterinarianController",
		data: { requireLogin : true }
	}).state({
		name: "pets",
		url: "/pets",
		templateUrl: "components/pets/pets.html",
		controller: "PetController",
		data: { requireLogin : true }
	}).state({
		name: "owners",
		url: "/owners",
		templateUrl: "components/owners/owners.html",
		controller: "OwnerController",
		data: { requireLogin : true }
	}).state({
		name: "ownerDetails",
		url: "/owners/:id",
		templateUrl: "components/owners/owner_details.html",
		controller: "OwnerDetailsController",
		data: {requireLogin : true}
	});

} ]);
You can read the UI-Router wiki to understand more about how this works.
Authentication
If your web application requires authentication and authorization to resources or you implement some kind of user role management, you will need a way for your AngularJS application to authenticate users who login to your page. You might already be using Spring Security for your application and you can still reuse the same code with slight modifications on how you handle session state after authentication. You can either opt to use a stateful way to maintain your credentials throughout the session or a stateless way by submitting your credentials in a cookie at every request. We prefer to go with the stateless way as it means that you are able to horizontally scale your servers and your authenticated credentials can be maintained across different servers.
This article does not go into details into either implementation but you can refer to this for more information on how you can integrate Spring security and AngularJS to perform this function.
Testing your AngularJS code
For a web application developer, one of the biggest bugbear is frontend testing of the UI. Traditionally, that meant having a way to unit test your Javascript code running on the browser as well as a functional way of emulating a real user clicking through your various features. AngularJS helps to ease both these problems by providing tools as well as a well-defined paradigm in its framework to encourage testing.
It has built-in mocking framework for mocking external HTTP calls and together with Jasmine, a BDD framework, allows you to easily write tests for your AngularJS directives.
You can also use a tool called Karma that will automatically run unit tests everytime you make changes to your code and in that way encourages TDD by giving you the red->refactor->green responsive cycle.
It is also possible to integrate a test-runner with your build tool like Maven using a maven plugin called jasmine-maven-plugin so that your javascript tests run each time you do a build.
Finally, for functional testing, you have a AngularJS recommended tool called Protractor that uses Selenium Webdriver to run your functional tests in a BDD syntax. Practically, we had some issues with functional testing using Protractor as there are many subtleties that will affect your functional test in AngularJS as Protractor has some syncing features that will wait for your AngularJS code to load before it proceeds with the tests but if certain steps venture out of your AngularJS app (for e.g. you perform OAuth authentication externally), it may fail.
Conclusion
Migrating to AngularJS from JSP may seem daunting but it can be very rewarding in the long run as it makes for a more maintainable and testable user interface. The trend towards client side rendered views also encourages building more responsive web applications that were previously hampered by the design in server side rendering. I hope this article will be a useful resource for a developer more familiar with JSP/Server-side templates to try AngularJS.
Sample Pet Clinic for reference
An example of a Spring Pet clinic application that we have tried to revamp as an AngularJS app with an updated design can be found here
blog comments powered by Disqus